The Nutanix Certified Master - Multicloud Infrastructure v6.10 (NCM-MCI) exam is designed for experienced infrastructure professionals who manage and optimize Nutanix environments across multiple cloud platforms. This certification validates your ability to analyze performance, troubleshoot complex issues, and implement business continuity strategies at an advanced level. This page provides a clear roadmap of exam topics, question formats, and practical preparation strategies to help you succeed. Whether you're building expertise in storage optimization, network performance, or VM management, the resources and guidance here will focus your study on what matters most.
Use this topic map to guide your study for Nutanix NCM-MCI (Nutanix Certified Master - Multicloud Infrastructure v6.10) within the Nutanix Certified Master path.
The NCM-MCI exam combines multiple question types to assess both theoretical knowledge and practical decision-making skills. Questions progress in difficulty and reflect real-world scenarios you will encounter in production environments.
Effective preparation requires mapping each topic area to dedicated study blocks and reinforcing connections between storage, network, VM, and business continuity workflows. A structured weekly schedule combined with hands-on practice and timed reviews will build both confidence and speed.
Explore other Nutanix certifications: view all Nutanix exams.
Strengthen your preparation with up-to-date resources from validexamdumps.com. These materials align to NCM-MCI and cover practical scenarios with clear explanations.
Visit the exam page to download the PDF, Online Practice Test or get Bundle Discount offer for both formats: Nutanix Certified Master - Multicloud Infrastructure v6.10.
Storage and VM performance optimization typically account for a larger portion of exam questions, as these directly impact user experience and operational efficiency. However, all five topic areas are essential; business continuity and troubleshooting skills are equally critical in real-world scenarios. Balance your study time across all domains while allocating slightly more practice to areas where you have less hands-on experience.
These three areas are interdependent: storage latency affects VM responsiveness, network bandwidth constraints limit data movement, and VM resource allocation determines overall cluster efficiency. Understanding how to diagnose and optimize across all three domains simultaneously is key to solving complex performance problems. Practice scenarios that require you to trace performance issues from the VM layer down to underlying storage and network infrastructure.
Practical experience with Nutanix cluster administration, performance monitoring, and troubleshooting is strongly recommended. Prioritize labs that cover performance analysis using Prism dashboards, storage optimization techniques, VM resource management, and backup/recovery workflows. Even simulated lab environments help reinforce concepts and build confidence in navigating the Nutanix management interface.
Many candidates overlook the business continuity topic or underestimate its depth, focusing too heavily on performance optimization alone. Others misread scenario questions and choose technically correct answers that don't match the specific business requirement described. Take time to read each question carefully, identify what the scenario is actually asking, and consider both technical and operational factors before selecting your answer.
Focus on timed practice tests to build pacing and identify remaining weak areas, rather than re-reading study materials. Review explanations for questions you missed, and spend time on topics where you scored below 80 percent. In the last 2-3 days, do a lighter review of key definitions and workflows instead of intensive study, which can increase anxiety without improving retention.
Task 16
Running NCC on a cluster prior to an upgrade results in the following output
FAIL: CVM System Partition /home usage at 93% (greater than threshold, 90%)
Identify the CVM with the issue, remove the fil causing the storage bloat, and check the health again by running the individual disk usage health check only on the problematic CVM do not run NCC health check
Note: Make sure only the individual health check is executed from the affected node
To identify the CVM with the issue, remove the file causing the storage bloat, and check the health again, you can follow these steps:
Log in to Prism Central and click on Entities on the left menu.
Select Virtual Machines from the drop-down menu and find the NCC health check output file from the list. You can use the date and time information to locate the file. The file name should be something like ncc-output-YYYY-MM-DD-HH-MM-SS.log.
Open the file and look for the line that says FAIL: CVM System Partition /home usage at 93% (greater than threshold, 90%). Note down the IP address of the CVM that has this issue. It should be something like X.X.X.X.
Log in to the CVM using SSH or console with the username and password provided.
Run the commanddu -sh /home/*to see the disk usage of each file and directory under /home. Identify the file that is taking up most of the space. It could be a log file, a backup file, or a temporary file. Make sure it is not a system file or a configuration file that is needed by the CVM.
Run the commandrm -f /home/<filename>to remove the file causing the storage bloat. Replace <filename> with the actual name of the file.
Run the commandncc health_checks hardware_checks disk_checks disk_usage_check --cvm_list=X.X.X.Xto check the health again by running the individual disk usage health check only on the problematic CVM. Replace X.X.X.X with the IP address of the CVM that you noted down earlier.
Verify that the output shows PASS: CVM System Partition /home usage at XX% (less than threshold, 90%). This means that the issue has been resolved.
#access to CVM IP by Putty
allssh df -h #look for the path /dev/sdb3 and select the IP of the CVM
ssh CVM_IP
ls
cd software_downloads
ls
cd nos
ls -l -h
rm files_name
df -h
ncc health_checks hardware_checks disk_checks disk_usage_check
Task 7
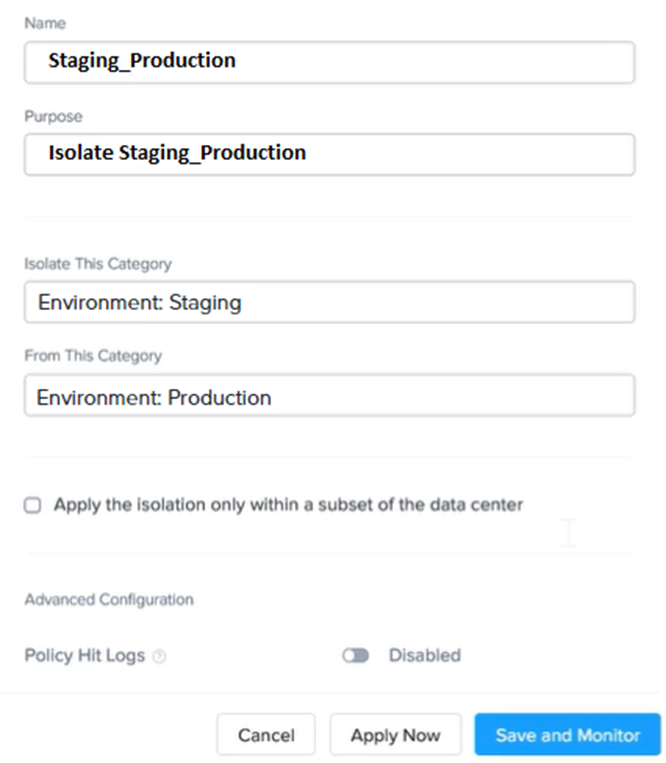
An administrator has environment that will soon be upgraded to 6.5. In the meantime, they need to implement log and apply a security policy named Staging_Production, such that not VM in the Staging Environment can communicate with any VM in the production Environment,
Configure the environment to satisfy this requirement.
Note: All other configurations not indicated must be left at their default values.
To configure the environment to satisfy the requirement of implementing a security policy named Staging_Production, such that no VM in the Staging Environment can communicate with any VM in the production Environment, you need to do the following steps:
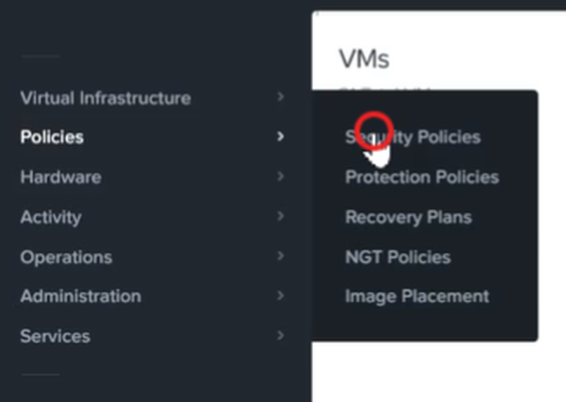
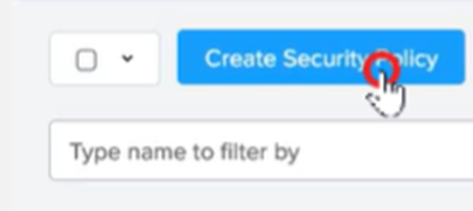
Log in to Prism Central and go to Network > Security Policies > Create Security Policy. Enter Staging_Production as the name of the security policy and select Cluster A as the cluster.
In the Scope section, select VMs as the entity type and add the VMs that belong to the Staging Environment and the Production Environment as the entities. You can use tags or categories to filter the VMs based on their environment.
In the Rules section, create a new rule with the following settings:
Direction: Bidirectional
Protocol: Any
Source: Staging Environment
Destination: Production Environment
Action: Deny
Save the security policy and apply it to the cluster.
This will create a security policy that will block any traffic between the VMs in the Staging Environment and the VMs in the Production Environment. You can verify that the security policy is working by trying to ping or access any VM in the Production Environment from any VM in the Staging Environment, or vice vers
a. You should not be able to do so.

Refer to the exhibit.

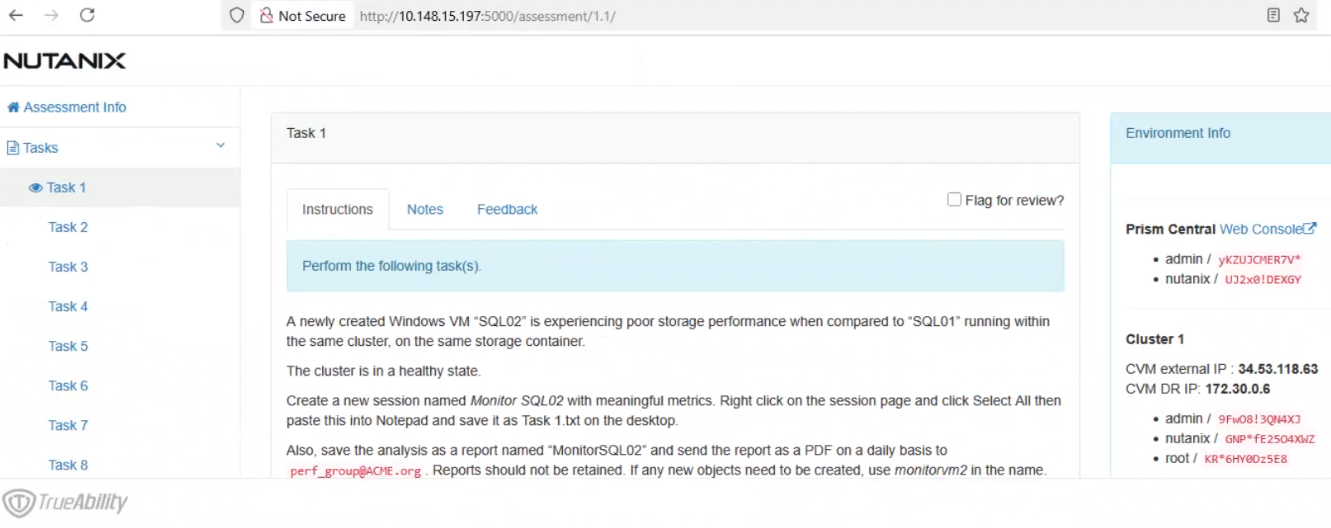
Task1
A newly created Windows VM ''SQL02'' is experiencing poor storage performance when compared to ''SQL01'' running within the same cluster, on the same storage container.
The cluster is in a healthy state.
Create a new session named Monitor SQL02 with meaningful metrics. Right click on the session page and click Select All then paste this into Notepad and save it as Task 1.txt on the desktop.
Also, save the analysis as a report named ''MonitorSQL02'' and send the report as a PDF on a daily basis to [email protected]. Reports should not be retained. If any new objects need to be created, use monitorvm2 in the name.
Finally, correct the issue within ''SQL02''
Notes:
Do not power on the VMs.
While you will be creating a session, you will need to examine the VM configurations to determine the issue.
Do not delete the VM to resolve the issue, any other destructive change is acceptable
This is a classic Nutanix performance troubleshooting scenario. The issue is almost certainly that the VM was created using the wrong Disk Bus Type (IDE or SATA instead of SCSI).
Here is the step-by-step solution to complete Task 1.
Part 1: Analysis and Reporting
Create the Session
Log in to Prism Central (or Prism Element, depending on the exam environment, but Analysis is usually a PC feature).
Navigate to Operations -> Analysis.
Click New Session.
Name: Monitor SQL02
Entity: Search for and select the VM named SQL02.
Metrics: Since the issue is storage performance, search for and add these specific metrics:
Hypervisor IOPS (or Controller IOPS)
Hypervisor IO Latency (or Controller IO Latency)
Hypervisor IO Bandwidth
Click Save.
Save Session Data (Task 1.txt)
Open the 'Monitor SQL02' session you just created.
(Per instructions): Right-click anywhere on the chart/data area -> Click Select All.
Copy the selected text (Ctrl+C).
Open Notepad on the provided desktop.
Paste the data.
Save the file as Task 1.txt on the Desktop.
Create and Schedule the Report
While still in the Analysis session, click the Create Report (or 'Add to Report') button.
Report Name: MonitorSQL02
Report Settings:
Format: PDF
Frequency: Daily
Email Recipient: [email protected]
Retention: 0 (or 'Do not retain', as requested).
Note: If the system forces you to create a new Report object and MonitorSQL02 is rejected, use monitorvm2 as the name per the instructions.
Save/Schedule the report.
Part 2: Diagnose and Fix the Issue
The Issue:
VM SQL02 was likely created with its data disks set to IDE or SATA.
Why this causes poor performance: IDE/SATA are emulated hardware with high CPU overhead and low queue depths (single-threaded).
The Standard: SQL01 (the healthy VM) is using SCSI, which is multithreaded and optimized for virtualization.
The Fix (Steps):
Navigate to the VM list in Prism.
Select SQL02 and click Update (or Edit).
Scroll down to the Disks section.
Identify the data disk(s). You will see the Bus Type listed as IDE or SATA.
Do not delete the VM. instead, perform a disk conversion (destructive change to the disk is allowed, but we want to keep the data).
Method to Convert (Clone to SCSI):
Hover over the IDE/SATA disk to see the path/filename of the vDisk (or write it down).
Click Add New Disk.
Operation: select Clone from ADSF file.
Path: Browse to the storage container and select the file associated with the current IDE disk.
Bus Type: Select SCSI (This is the critical fix).
Index: Ensure it doesn't conflict with existing disks (usually index 1 or higher for data).
Click Add.
Once the new SCSI disk is added, find the original IDE/SATA disk and click the X to remove it.
Click Save.
Note: You do not need to power on the VM to verify. The change from IDE to SCSI allows the VM to use the Nutanix VirtIO drivers for maximum storage performance.
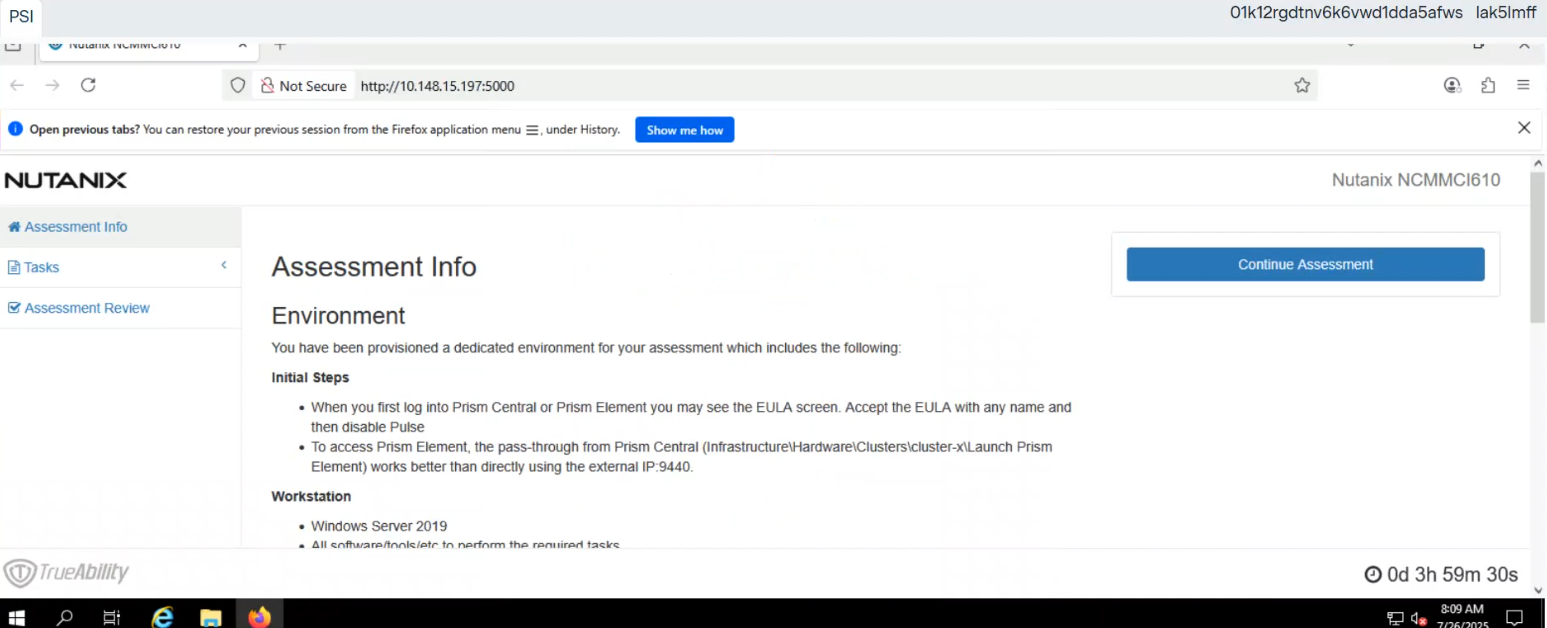
Topic 1, Performance Based Questions
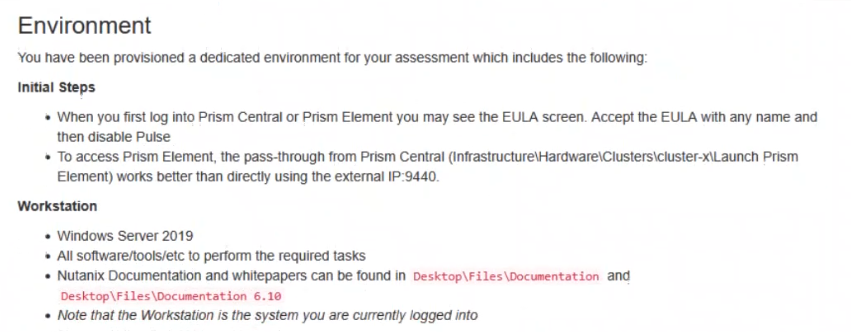
Environment
You have been provisioned a dedicated environment for your assessment which includes the following:
Workstation
* windows Server 2019
* All software/tools/etc to perform the required tasks
* Nutanix Documentation and whitepapers can be found in desktop\files\Documentation
* Note that the workstation is the system you are currently togged into
Nutanix Cluster
* There are three clusters provided. The connection information for the relevant cluster will be displayed to the high of the question Please make sure you are working on the correct cluster for each item Please ignore any licensing violations
* Cluster A is a 3-node cluster with Prism Central 2022.6 where most questions will be performed
* Cluster B is a one-node cluster and has one syslog item and one security item to perform
* Cluster D is a one-node duster with Prism Central 5.17 and has a security policy item to perform
Important Notes
* If the text is too small and hard to read, or you cannot see an of the GUI. you can increase/decrease the zoom of the browser with CTRL + ,and CTRL + (the plus and minus keys)
You will be given 3 hours to complete the scenarios for Nutanix NCMMCI
Once you click the start button below, you will be provided with:
- A Windows desktop A browser page with the scenarios and credentials (Desktop\instructions)
Notes for this exam delivery:
The browser can be scaled lo Improve visibility and fit all the content on the screen.
- Copy and paste hot-keys will not work Use your mouse for copy and paste.
- The Notes and Feedback tabs for each scenario are to leave notes for yourself or feedback for
- Make sure you are performing tasks on the correct components.
- Changing security or network settings on the wrong component may result in a falling grade.
- Do not change credentials on an component unless you are instructed to.
- All necessary documentation is contained in the Desktop\Files\Documentation directory
Task 1
An administrator has been asked to configure a storage for a distributed application which uses large data sets across multiple worker VMs.
The worker VMs must run on every node. Data resilience is provided at the application level and low cost per GB is a Key Requirement.
Configure the storage on the cluster to meet these requirements. Any new object created should include the phrase Distributed_App in the name.
To configure the storage on the cluster for the distributed application, you can follow these steps:
Log in to Prism Element of cluster A using the credentials provided.
Go to Storage > Storage Pools and click on Create Storage Pool.
Enter a name for the new storage pool, such as Distributed_App_Storage_Pool, and select the disks to include in the pool. You can choose any combination of SSDs and HDDs, but for low cost per GB, you may prefer to use more HDDs than SSDs.
Click Save to create the storage pool.
Go to Storage > Containers and click on Create Container.
Enter a name for the new container, such as Distributed_App_Container, and select the storage pool that you just created, Distributed_App_Storage_Pool, as the source.
Under Advanced Settings, enable Erasure Coding and Compression to reduce the storage footprint of the dat
a. You can also disable Replication Factor since data resilience is provided at the application level. These settings will help you achieve low cost per GB for the container.
Click Save to create the container.
Go to Storage > Datastores and click on Create Datastore.
Enter a name for the new datastore, such as Distributed_App_Datastore, and select NFS as the datastore type. Select the container that you just created, Distributed_App_Container, as the source.
Click Save to create the datastore.
The datastore will be automatically mounted on all nodes in the cluster. You can verify this by going to Storage > Datastores and clicking on Distributed_App_Datastore. You should see all nodes listed under Hosts.
You can now create or migrate your worker VMs to this datastore and run them on any node in the cluster. The datastore will provide low cost per GB and high performance for your distributed application.
Task 15
An administrator found a CentOS VM, Cent_Down, on the cluster with a corrupted network stack. To correct the issue, the VM will need to be restored from a previous snapshot to become reachable on the network again.
VM credentials:
Username: root
Password: nutanix/4u
Restore the VM and ensure it is reachable on the network by pinging 172.31.0.1 from the VM.
Power off the VM before proceeding.
To restore the VM and ensure it is reachable on the network, you can follow these steps:
Log in to the Web Console of the cluster where the VM is running.
Click on Virtual Machines on the left menu and find Cent_Down from the list. Click on the power icon to power off the VM.
Click on the snapshot icon next to the power icon to open the Snapshot Management window.
Select a snapshot from the list that was taken before the network stack was corrupted. You can use the date and time information to choose a suitable snapshot.
Click on Restore VM and confirm the action in the dialog box. Wait for the restore process to complete.
Click on the power icon again to power on the VM.
Log in to the VM using SSH or console with the username and password provided.
Run the commandping 172.31.0.1to verify that the VM is reachable on the network. You should see a reply from the destination IP address.
Go to VMS from the prism central gui
Select the VMand go to More -> Guest Shutdown
Go to Snapshots tab and revert to latest snapshot available
power on vm and verify if ping is working