At ValidExamDumps, we consistently monitor updates to the Microsoft MS-100 exam questions by Microsoft. Whenever our team identifies changes in the exam questions,exam objectives, exam focus areas or in exam requirements, We immediately update our exam questions for both PDF and online practice exams. This commitment ensures our customers always have access to the most current and accurate questions. By preparing with these actual questions, our customers can successfully pass the Microsoft 365 Identity and Services exam on their first attempt without needing additional materials or study guides.
Other certification materials providers often include outdated or removed questions by Microsoft in their Microsoft MS-100 exam. These outdated questions lead to customers failing their Microsoft 365 Identity and Services exam. In contrast, we ensure our questions bank includes only precise and up-to-date questions, guaranteeing their presence in your actual exam. Our main priority is your success in the Microsoft MS-100 exam, not profiting from selling obsolete exam questions in PDF or Online Practice Test.
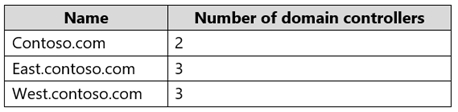
Your network contains two on-premises Active Directory forests named contoso.com and fabrikam.com. Fabrikam.com contains one domain and five domain controllers. Contoso.com contains the domains shown in the following table.
You need to sync all the users from both the forests to a single Azure Active Directory (Azure AD) tenant by using Azure AD Connect.
What is the minimum number of Azure AD Connect sync servers required?
You can have only one active Azure AD Connect server synchronizing accounts to a single Azure Active Directory (Azure AD) tenant. You can have 'backup' Azure AD Connect servers, but these must be running in 'staging' mode. Staging mode means the Azure AD Connect instance is not actively synchronizing users but is ready to be bought online if the active Azure AD Connect instance goes offline.
When you have multiple forests, all forests must be reachable by a single Azure AD Connect sync server. The server must be joined to a domain. If necessary, to reach all forests, you can place the server in a perimeter network (also known as DMZ, demilitarized zone, and screened subnet).
You have a Microsoft 365 subscription.
All users have their email stored in Microsoft Exchange Online
In the mailbox of a user named User, you need to preserve a copy of all the email messages that contain the word ProjectX.
What should you do first?
When you configure conditions for a label, you can automatically assign a label to a document or email. In this case, we would create a label to label all email messages that contain the word ProjectX. We would then create a label policy to preserve a copy of all message that have the label assigned.
https://docs.microsoft.com/en-us/azure/information-protection/configure-policy-classification
You have a Microsoft 365 subscription that uses an Azure Directory (Azure AD) tenant named Contoso.com. The tenant contains the users shown in the following table.

You add another user named user5 to the User administrator role.
You need to identify which management tasks User5 can perform.
Which two tasks should you identify? Each correct answer presents a complete solution.
Users with the User Administrator role can create users and manage all aspects of users with some restrictions (see below).
Only on users who are non-admins or in any of the following limited admin roles:
Directory Readers
Guest Inviter
Helpdesk Administrator
Message Center Reader
Reports Reader
User Administrator
You have an on-premises Microsoft Exchange Server organization that contains 500 mailboxes and a third-party email archive solution.
You have a Microsoft 365 tenant that contains a user named User1.
You plan to use the User1 account to perform a PST import of the archive mailboxes to the tenant.
Which two roles does User1 require to perform the import? The solution must use the principle of least privilege. Each correct answer presents part of the solution.
NOTE: Each correct selection is worth one point.
Please wait while the virtual machine loads. Once loaded, you may proceed to the lab section. This may take a few minutes, and the wait time will not be deducted from your overall test time.
When the Next button is available, click it to access the lab section. In this section, you will perform a set of tasks in a live environment. While most functionality will be available to you as it would be in a live environment, some functionality (e.g., copy and paste, ability to navigate to external websites) will not be possible by design.
Scoring is based on the outcome of performing the tasks stated in the lab. In other words, it doesn't matter how you accomplish the task, if you successfully perform it, you will earn credit for that task.
Labs are not timed separately, and this exam may have more than one lab that you must complete. You can use as much time as you would like to complete each lab. But, you should manage your time appropriately to ensure that you are able to complete the lab(s) and all other sections of the exam in the time provided.
Please note that once you submit your work by clicking the Next button within a lab, you will NOT be able to return to the lab.
You may now click next to proceed to the lab.
Lab information
Use the following login credentials as needed:
To enter your username, place your cursor in the Sign in box and click on the username below.
To enter your password, place your cursor in the Enter password box and click on the password below.
Microsoft 365 Username:
Microsoft 365 Password: 3&YWyjse-6-d
If the Microsoft 365 portal does not load successfully in the browser, press CTRL-K to reload the portal in a new browser tab.
The following information is for technical support purposes only:
Lab Instance: 10887751
You hire a new global administrator named Irvin Sayers to manage your Microsoft 365 tenant.
You need to modify Irvin Sayers to meet the following requirements:
Uses at least two methods of user authentication
Has the highest Microsoft Office 365 administrative privileges
You need to assign the Global Admin role to Irvin Sayers. You then need to configure the account to require Multi-Factor Authentication (MFA).
1. In the Microsoft 365 admin center, select Users then select Active Users.
2. Select the Irvin Sayers account to open the account properties blade.
3. In the Roles section, click on the 'Manage roles' link.
4. Select the 'Admin center access' option.
5. Select Global Administrator then click the 'Save changes' button.
The next step is to enable the account for Multi-Factor Authentication (MFA).
1. If the Irvin Sayers account is selected in the user accounts list, deselect it (click on the tick icon next to the account name). Selecting a user account changes the menu options at the top of the page; deselecting the accounts changes the menu options back.
2. Click on the 'Multi-factor authentication' link at the top of the page.
3. In the 'Multi-factor authentication' page, select the Irvin Sayers account.
4. Click the 'Enable' link on the right side of the page.
5. In the pop-up window, click the 'enable multi-factor auth' button.