The Juniper Data Center Certification validates your expertise in designing, deploying, and operating modern data center solutions. The JN0-481 exam (Data Center, Specialist) assesses your ability to work with Juniper's intent-based networking platform across real-world scenarios. This page maps the exam syllabus, explains question formats, and guides your study strategy so you can prepare efficiently and confidently.
Use this topic map to guide your study for Juniper JN0-481 (Data Center, Specialist) within the Juniper Data Center Certification path.
The JN0-481 exam combines knowledge-based and scenario-driven items to measure both conceptual understanding and practical decision-making in data center environments.
Questions increase in complexity as you progress, rewarding deeper knowledge of how design, deployment, and operations interconnect in production data centers.
Effective preparation maps each exam topic to a structured study schedule and reinforces learning through practice and review. Allocate 4-6 weeks to cover all domains, with heavier focus on Apstra workflows and multitenancy design since these appear frequently on the exam.
Explore other Juniper certifications: view all Juniper exams.
Strengthen your preparation with up-to-date resources from validexamdumps.com. These materials align to JN0-481 and cover practical scenarios with clear explanations.
Visit the exam page to download the PDF, Online Practice Test, or get a Bundle Discount offer for both formats: Data Center, Specialist.
Apstra workflows (Design, Build, Deploy, and Operations phases) and multitenancy design represent roughly 50% of exam content. Data center architectures and intent-based analytics each account for 20-25%. Prioritize hands-on familiarity with blueprint creation, device staging, and tenant isolation policies to maximize your score.
The Design phase defines intent (IP pools, rack types, logical topology) in a blueprint, while the Build and Deploy phases translate that intent into device configurations and push them to hardware. Understanding this workflow is critical because exam scenarios often ask you to trace a design choice through to its deployment outcome or identify when a configuration deviation breaks the original intent.
Direct experience with Apstra is valuable but not mandatory if you study the design and operational workflows carefully. Prioritize labs or demos covering blueprint creation, multitenancy setup, and analytics interpretation. If access is limited, focus on understanding the logical flow: how a design translates to config, how Apstra validates intent, and how to respond to operational alerts.
Confusing underlay and overlay roles, misunderstanding VXLAN encapsulation scope, and overlooking multitenancy isolation rules are frequent pitfalls. Another common error is choosing a design option without considering operational impact or analytics constraints. Always read scenario questions twice and trace your answer through the full workflow before selecting it.
Spend 3-4 days doing focused practice on your weakest topics (use practice test analytics to identify them), then dedicate 2-3 days to timed full-length mocks. In the final 2-3 days, review explanations from all practice questions you missed, sketch key diagrams (leaf-spine, VXLAN encapsulation, multitenancy enforcement), and do a light review of terminology. Avoid cramming new material; focus on reinforcing what you already know.
You are asked to deploy a collapsed fabric architecture. Which two statements are correct about this deployment? (Choose two.)
In Apstra, a collapsed fabric (also described as ''spineless'') consolidates traditional fabric tiers so that the primary fabric devices perform combined roles. Instead of a dedicated spine tier providing transit between leafs, the fabric is formed by leaf devices connected directly to each other using mesh links. This means a collapsed fabric uses a full-mesh topology at the leaf level, replacing the usual leaf-to-spine connections found in a three-stage Clos. Therefore, the statement that leaf devices are full-mesh connected is correct.
Because the collapsed fabric devices serve the fabric roles, they also provide the EVPN-VXLAN overlay functions (VTEP behavior, EVPN control-plane participation, and VXLAN encapsulation/decapsulation) necessary for tenant segmentation and service delivery. Juniper's collapsed fabric validated designs further describe the collapsed fabric switches as serving all fabric roles (including border-leaf behaviors when external connectivity is required), reinforcing that overlay functions reside on these fabric leaf devices.
The remaining statements are not generally true for the collapsed fabric definition. Top-of-rack (access) switches---when present in certain collapsed designs---are not defined by default as full-mesh connected, and VXLAN support is not a requirement for those TOR/access switches unless the specific architecture explicitly uses them as VTEPs. The defining characteristics are the consolidated fabric roles and the leaf-level full-mesh.
Verified Juniper sources (URLs):
https://www.juniper.net/documentation/us/en/software/apstra5.0/apstra-user-guide/topics/concept/templates.html
https://www.juniper.net/documentation/us/en/software/apstra4.2/apstra-user-guide/topics/concept/rack-types.html
https://www.juniper.net/documentation/us/en/software/jvd/jvd-collapsed-dc-fabric-with-apstra/jvd-collapsed-dc-fabric-with-apstra.pdf
Exhibit.
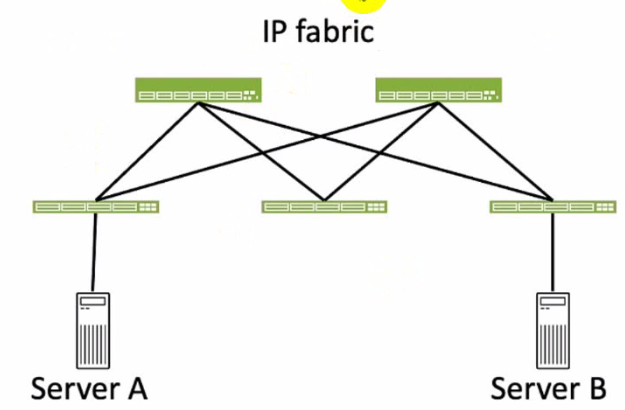
Referring to the exhibit, how many broadcast domains will an Ethernet frame pass through when traversing the IP fabric from Server A to Server B?
Referring to the exhibit, the image shows a simplified diagram of an IP fabric network connecting two servers, labeled as Server A and Server B. The IP fabric is a network architecture that uses a Clos topology to provide high bandwidth, low latency, and scalability for data center networks.The IP fabric consists of spine and leaf devices that use BGP as the routing protocol and VXLAN as the overlay technology1.
A broadcast domain is a logical portion of a network where any device can directly transmit broadcast frames to other devices at the data link layer (OSI Layer 2). A broadcast frame is a frame that has a destination MAC address of all ones (FF:FF:FF:FF:FF:FF), which means that it is intended for all devices in the same broadcast domain.A broadcast domain is usually bounded by a router, which does not forward broadcast frames to other networks2.
In the exhibit, there are two broadcast domains that an Ethernet frame will pass through when traversing the IP fabric from Server A to Server B. The first broadcast domain is the one that contains Server A and the leaf device that it is connected to. The second broadcast domain is the one that contains Server B and the leaf device that it is connected to. The IP fabric itself is not a broadcast domain, because it uses IP routing and VXLAN encapsulation to transport the Ethernet frames over the Layer 3 network. Therefore, the statement C is correct in this scenario.
The following three statements are incorrect in this scenario:
A . 1. This is not true, because there are not one, but two broadcast domains that an Ethernet frame will pass through when traversing the IP fabric from Server A to Server B. The IP fabric itself is not a broadcast domain, because it uses IP routing and VXLAN encapsulation to transport the Ethernet frames over the Layer 3 network.
B . 4. This is not true, because there are not four, but two broadcast domains that an Ethernet frame will pass through when traversing the IP fabric from Server A to Server B. The spine devices and the leaf devices that are not connected to the servers are not part of the broadcast domains, because they use IP routing and VXLAN encapsulation to transport the Ethernet frames over the Layer 3 network.
D . 3. This is not true, because there are not three, but two broadcast domains that an Ethernet frame will pass through when traversing the IP fabric from Server A to Server B. The IP fabric itself is not a broadcast domain, because it uses IP routing and VXLAN encapsulation to transport the Ethernet frames over the Layer 3 network.
IP Fabric Overview
Broadcast Domain - NetworkLessons.com
Which two actions are required during Juniper Apstra's deploy phase? (Choose two.)
The deploy phase is the final step in the Juniper Apstra data center fabric design and deployment process. In this phase, you apply the Apstra-rendered configuration to the devices and verify the intent of the blueprint.Based on the web search results, we can infer the following actions are required during the deploy phase12:
Assign device profiles to the blueprint.This action associates a specific vendor model to each logical device in the blueprint. Device profiles contain extensive hardware model details, such as form factor, ASIC, CPU, RAM, ECMP limit, and supported features. Device profiles also define how configuration is generated, how telemetry commands are rendered, and how configuration is deployed on a device.Device profiles enable the Apstra system to render and deploy the configuration according to the Apstra Reference Design34.
Assign resources to the blueprint.This action allocates the physical devices, IP addresses, VLANs, and ASNs to the logical devices, networks, and routing zones in the blueprint. Resources can be assigned manually or automatically by the Apstra system.Assigning resources ensures that the blueprint has all the necessary elements to generate the configuration and deploy the fabric5.
Assign user roles to the blueprint.This action is not required during the deploy phase. User roles are defined at the system level, not at the blueprint level. User roles determine the permissions and access levels of different users in the Apstra system. User roles can be system-defined or custom-defined .
Assign interface maps to the blueprint.This action is not required during the deploy phase. Interface maps are defined at the design phase, not at the deploy phase. Interface maps are objects that map the logical interfaces of a logical device to the physical interfaces of a device profile. Interface maps enable the Apstra system to generate the correct interface configuration for each device in the fabric .Reference:
Deploy
Deploy Device
Device Profiles
Juniper Device Profiles
Resources
You are considering the bridged overlay EVPN-VXLAN architecture. In this scenario, how many VLANs would be enabled in the VLAN-based service type at the MAC-VRF EVPN instance level?
In Junos EVPN, the service type determines how VLANs (broadcast domains) are mapped into EVPN constructs. With VLAN-based service, the mapping is one-to-one: a single VLAN (single broadcast domain) maps to a single EVPN instance (EVI), resulting in a separate bridge table per VLAN. When you implement EVPN-VXLAN in a bridged overlay (L2 extension over an L3 underlay), leaf devices act as VTEPs and encapsulate VLAN traffic into VXLAN using the associated VNI, but the service-type mapping rule still applies.
At the MAC-VRF hierarchy, you configure the EVPN-VXLAN parameters and choose the service type for that EVPN instance. If the service type selected is VLAN-based, then the EVI represents exactly one VLAN at that EVPN instance level. If you need multiple VLANs under the same MAC-VRF/EVI construct, Junos provides alternative service types (for example, VLAN-aware or VLAN-bundle) specifically intended to associate multiple VLANs with a single EVPN instance; that is not what VLAN-based service does.
Therefore, in a bridged overlay EVPN-VXLAN design using VLAN-based service at the MAC-VRF EVPN instance level, the correct answer is one VLAN. This remains true regardless of how many total VLANs exist across the fabric; each VLAN-based EVI handles a single VLAN.
Verified Juniper sources (URLs):
https://www.juniper.net/documentation/us/en/software/junos/evpn/topics/concept/evpn-based-services.html
https://www.juniper.net/documentation/us/en/software/junos/evpn/topics/concept/mac-vrf-routing-instance-overview.html
You are performing an upgrade to your switches in your network. You want to ensure that the upgrade can be performed without interrupting traffic. In the Juniper Apstra UI, which deploy mode should be used to accomplish this task?
In Apstra, Deploy Mode = Drain is the operational mechanism used to gracefully remove a switch from active forwarding before performing maintenance such as an OS upgrade. Drain mode is specifically intended to drain traffic while preserving fabric stability, so that maintenance can be executed with minimal to no application impact, provided the fabric design has sufficient redundancy (for example, ECMP in the underlay and dual-homing/ESI for server attachments). In an EVPN-VXLAN IP fabric, taking a leaf or spine abruptly out of service can cause transient loss of reachability as underlay adjacencies reconverge and the overlay recalculates paths. By placing the device into Drain, Apstra adjusts intent so that traffic is shifted away from the device as much as possible, reducing dependency on it before the upgrade begins.
This is different from Undeploy, which removes Apstra-rendered configuration and is generally used for decommissioning; if a device is carrying traffic, Apstra guidance is to drain first. Ready is a pre-deploy state used in lifecycle workflows, not a maintenance traffic-shifting mode. Deploy keeps the device fully participating. Therefore, for a maintenance window where the goal is ''upgrade with minimal interruption,'' the correct mode is Drain, then perform the Junos v24.4 upgrade, and finally return the device to Deploy.
Verified Juniper sources (URLs):
https://www.juniper.net/documentation/us/en/software/apstra4.2/apstra-drain-mode/apstra-drain-mode.pdf
https://www.juniper.net/documentation/us/en/software/apstra4.2/apstra-user-guide/topics/topic-map/deploy-mode-update-datacenter.html
https://www.juniper.net/documentation/us/en/software/apstra6.0/apstra-user-guide/topics/topic-map/device-config-lifecycle.html