The AD0-E906 exam validates your expertise in deploying and managing the Adobe Workfront for Experience Manager Enhanced Connector. This certification is designed for professionals who configure, troubleshoot, and optimize the connector to streamline asset workflows between Adobe Workfront and Experience Manager environments. This landing page provides a clear roadmap of exam topics, question formats, and actionable preparation strategies to help you build confidence and pass on your first attempt.
Use this topic map to guide your study for Adobe AD0-E906 (Adobe Workfront for Experience Manager Enhanced Connector Expert) within the Adobe Workfront path.
The AD0-E906 exam uses multiple question types to assess both conceptual knowledge and practical decision-making skills. You will encounter scenarios that mirror real-world implementation challenges and require you to select the most effective solution.
Questions progress in difficulty and emphasize practical application, ensuring that passing the exam demonstrates readiness to manage the connector in production settings.
An effective study plan distributes your effort across all four core domains and builds from foundational knowledge to hands-on troubleshooting. Dedicate time each week to one or two topics, practice scenario questions, and simulate the exam environment to build pacing confidence.
Explore other Adobe certifications: view all Adobe exams.
Strengthen your preparation with up-to-date resources from validexamdumps.com. These materials align to AD0-E906 and cover practical scenarios with clear explanations.
Visit the exam page to download the PDF, Online Practice Test, or get a bundle discount for both formats: Adobe Workfront for Experience Manager Enhanced Connector Expert.
Configuration and Installation and Configuration of Connector typically account for the largest portion of exam questions because they directly test hands-on deployment skills. However, Technical Requirements and Business Practices are equally important for understanding constraints and designing solutions that align with organizational needs. Balanced preparation across all four domains is essential for strong performance.
In practice, you first assess Technical Requirements to ensure your infrastructure can support the connector, then proceed through Installation and Configuration of Connector to deploy and initialize it. Configuration follows, where you map fields, define rules, and establish permissions. Business Practices inform every step, guiding decisions about governance, user roles, and approval chains. Understanding these connections helps you answer scenario questions that ask you to prioritize or sequence tasks correctly.
Focus on labwork involving connector setup in a sandbox environment, metadata field mapping between Workfront and Experience Manager, and permission configuration. Practice troubleshooting common integration issues such as failed asset syncs or metadata mismatches. If possible, observe or participate in a real connector implementation to see how configuration decisions affect user workflows and asset governance.
Many candidates overlook Business Practices questions because they focus solely on technical setup steps. Others misunderstand the order of configuration tasks or confuse Workfront-side settings with Experience Manager-side settings. A third common error is selecting the most obvious answer without reading scenario details carefully. Slow down on scenario questions, re-read the problem statement, and eliminate answers that address only part of the issue.
Dedicate three days to reviewing weak topic areas identified in practice tests, two days to full-length timed simulations, and two days to light review and rest. Avoid learning new material in the final week; instead, focus on reinforcing concepts you already understand and building confidence. The night before your exam, review key definitions and configuration sequences, but do not cram heavily.
An AEM server is overloaded with too many concurrently running workflows. The developer decides to reduce the number of concurrent workflows. What should be configured?
In AEM, to limit the number of concurrent workflows running at the same time, you need to adjust the Maximum Parallel Jobs setting in the OSGI console. This setting controls how many workflow jobs can be processed simultaneously, and reducing this number will lower the load on the server by limiting the number of workflows that can run concurrently.
This setting can be found under the Day CQ Workflow - Workflow Engine configuration in the OSGI Web Console.
Options B and C refer to specific workflows and threads, but they do not directly address the overall system limit on concurrent workflow executions.
Refer to the AEM documentation on workflow scaling and performance for more information on how to adjust these settings in the OSGI configuration.
An AEM application requires a service user WRITE access to children nodes but not on the parent node itself. Which console should the developer use to apply appropriate ACL?
In AEM, when you need to manage access control (ACL) permissions, including setting specific permissions (like WRITE) for a service user on child nodes without affecting the parent node, the Permission Console is the appropriate tool.
The Permission Console allows you to set fine-grained permissions at both node and subnode levels, which is crucial for scenarios where access needs to be applied only to children nodes, not the parent node itself.
Option A (User Management Console) is used for managing user details, and Option C (Group Management Console) manages group settings, but neither of these are used for setting node-level permissions.
Refer to AEM's User and Group Access Management documentation for more information on using the Permission Console to manage ACLs effectively.
Given the following workflow launcher configuration:
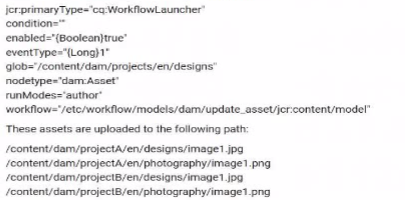
What change should be made to the configuration to trigger the workflow?
In this scenario, the workflow launcher is configured to trigger a workflow for assets in the path /content/dam/projects/en/designs. However, to ensure that the workflow only triggers for image assets, the condition must be updated to filter the relevant asset types. The condition should be modified to dc:format==image/*, which ensures that only assets with an image format trigger the workflow.
Condition 'dc
==image/*': This filters assets based on their format (MIME type), ensuring that the workflow is only triggered for images, which matches the use case of working with assets such as JPGs or PNGs.
Option B suggests modifying the path, but the existing path (/content/dam/projects/en/designs) is correct for the project structure. Option C suggests changing the node type to nt:file, which is incorrect since the node type for assets in AEM is typically dam:Asset.
For more information, refer to AEM documentation on workflow launchers and DAM metadata properties.
A customer sets up a calculated field on a request form. A user manually converts the request to a project and selects a template from the available active templates. How should the administrator configure the Project custom form to make sure the value is passed to the project on conversion?
When converting a request to a project in Adobe Workfront, it's important to ensure that custom fields and their values are correctly passed from the request form to the project form. To achieve this, you need to add the same custom field on the project form, but in this case, the calculation should be left blank because the calculated value from the request form will be passed over and does not need to be recalculated at the project level.
Same field: The field needs to be exactly the same (same internal name) so the data can flow between the request and the project during the conversion.
Blank calculation: By leaving the calculation blank, you ensure that the field will accept the value from the request without overriding it or attempting to recalculate it.
For more details on setting up custom forms in Workfront and handling calculated fields during request-to-project conversions, refer to the Adobe Workfront Form Customization Guide.
A user wants to create watermarked renditions of only some of the assets in AEM Assets. Which workflow strategy should be used to achieve this goal?
To create watermarked renditions for only some of the assets in AEM, the best approach is to create a new workflow model that includes the Add Watermark process. This new workflow can be selectively applied to specific assets as needed, rather than modifying the global DAM Update Asset workflow which would affect all assets.
Selective application: By creating a custom workflow model, users can choose which assets will go through the watermarking process, providing more control and preventing unnecessary watermarking of all assets.
Option B and C suggest modifying the existing DAM Update Asset workflow, which could result in watermarking all assets, not just the desired ones, and is not flexible for specific asset selection.
Refer to AEM's workflow documentation for more information on creating custom workflows and adding watermark processes.